Hello everyone,
As a photographer, I’m truly obsessed with color fidelity. Whether I’m editing on my main workstation or working on a portable setup like the Argon ONE Up, I just can’t live with shifting tones or inaccurate whites. Getting a reference-grade display out of a Raspberry Pi–based system isn’t easy, but after many hours of tweaking and testing, I managed to achieve a DeltaE of 0.3 on this device.
I’m sharing this full guide in the hope that it helps other photographers and creators squeeze the very best performance out of their Argon ONE Up internal display.
The Argon ONE Up uses an internal BOE/ASL display connected via an internal HDMI-to-I2C bridge. To get professional color accuracy (DeltaE < 0.5), you must calibrate the hardware via DDC/CI before applying a software ICC profile.
Prerequisites
-
OS: Raspberry Pi OS Lite (Debian Trixie) with GNOME Desktop (it should also work with other desktop environments).
-
Hardware: Argon ONE Up with CM5.
-
Tools: A colorimeter (e.g., SpyderX, i1Display Pro). In my case I’ve used the i1.
Step 1: Install ddcutil and Identify your Hardware
First, we need the tools to communicate with the monitor’s internal controller via the I2C bus.
bash
sudo apt update
sudo apt install ddcutil i2c-tools
sudo usermod -aG i2c $USER
(Restart your session for group permissions to take effect)
Understanding your Display Capabilities
Before calibrating, we need to identify the display bus and its features. Run the following commands and take note of the output:
1. Detect the Display Bus:
bash
sudo ddcutil detect
Output example from my Argon ONE Up:
text
Display 1
   I2C bus:  /dev/i2c-14
   DRM connector:           card1-HDMI-A-2
   EDID synopsis:               BOE - BOE
   VCP version:         2.1
2. Check Supported Features (VCP Codes):
bash
ddcutil capabilities
Output example from my Argon ONE Up:
text
VCP Features:
   Feature: 10 (Brightness)
   Feature: 12 (Contrast)
   Feature: 16 (Video gain: Red)
   Feature: 18 (Video gain: Green)
   Feature: 1A (Video gain: Blue)
Why is this info vital for display calibration?
-
Bus 14: Tells us exactly where to send commands (
--bus 14) to avoid scanning other ports and causing errors. -
Feature 10 (Brightness): Crucial to set your luminance target (e.g., 120 cd/m²) in hardware.
-
Feature 12 (Contrast): Leave this at its default value (usually 50) to avoid clipping highlights and losing tonal range.
-
Features 16, 18, 1A: Confirms we have hardware-level control over Red, Green, and Blue gains. This allows us to fix the “White Point” in the monitor’s hardware before the ICC profile even touches the signal.
***************************************************************************************
Step 2: Interactive Hardware Calibration (DisplayCAL)
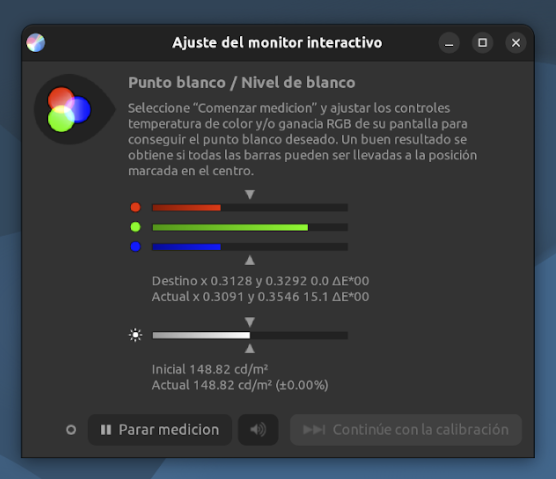
Using DisplayCAL and a colorimeter (like a SpyderX or i1Display), enter the “Interactive Display Adjustment” screen. We will align the RGB bars and set the brightness target by sending raw commands to the monitor.
Before adjustment
After adjustment
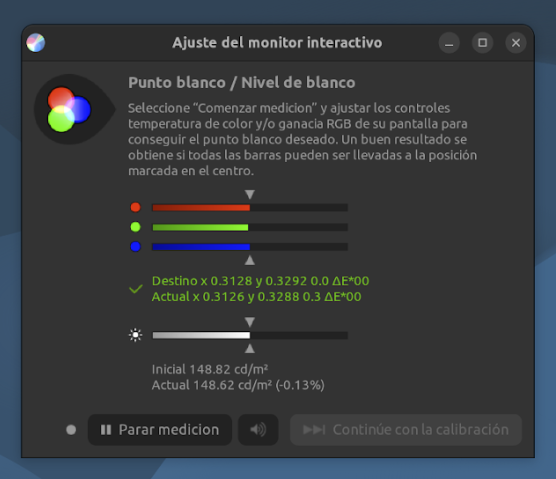
Based on my calibration for a neutral white point, these were my optimal values:
-
Brightness (Feature 10) to 63:
ddcutil --bus 14 setvcp 10 63(Adjust this to reach your desired cd/m²). -
Contrast (Feature 12): Left at default to preserve detail.
-
Align Green (Feature 18) to 58:
ddcutil --bus 14 setvcp 18 58 -
Align Blue (Feature 1A) to 88:
ddcutil --bus 14 setvcp 1A 88 -
Red (Feature 16) stays at 100:
ddcutil --bus 14 setvcp 16 100
By tweaking these via terminal while watching the DisplayCAL bars, I achieved a hardware DeltaE of 0.3, which is quite good.. This ensures the highest possible bit-depth is preserved and minimizes banding.
***************************************************************************************
Step 3: Generate and Install the ICC Profile
Once the hardware is balanced:
-
Proceed with the full “Calibration & Profiling” in DisplayCAL.
-
Save the resulting
.iccprofile. -
In GNOME (Wayland), go to Settings > Color and import your profile. GNOME will now handle the software-level fine-tuning automatically.
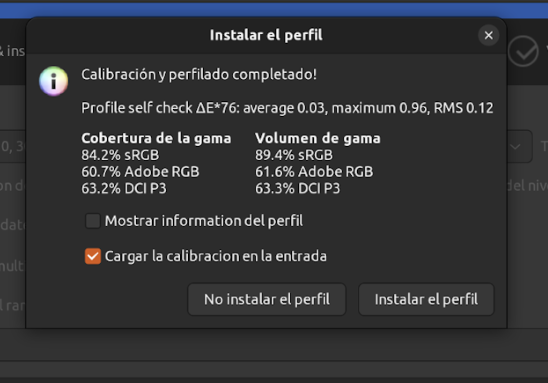
ICC profile generated before performing hardware white balance adjustment
ICC profile generated after performing hardware white balance adjustment
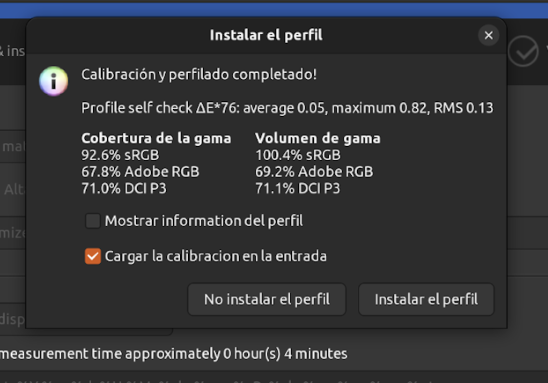
As you can see, after the hardware white balance adjustment, the ICC profile is significantly improved. Color accuracy is quite good.
***************************************************************************************
Step 4: Automating Hardware Settings (Systemd Service)
Monitor hardware settings are often lost after a reboot. To ensure our photographer-grade calibration is always active, we create a silent system service.
-
Create the file:
sudo nano /etc/systemd/system/ddcutil-gamma.service -
Paste the following:
ini
[Unit]
Description=apply ddcutil ArgonONEUp display settings
After=graphical.target

[Service]
Type=oneshot
# Optimal settings by DisplayCAL: Brightness 63, Red 100, Green 58, Blue 88
# Contrast (12) is left at default. No 'User 1' mode (14) needed for this firmware.
ExecStart=/usr/bin/ddcutil --bus 14 --sleep-multiplier 2.0 setvcp 10 63 16 100 18 58 1A 88
# Using LogLevelMax=emerg ensures a clean system log (no ddcutil spam)
LogLevelMax=emerg
RemainAfterExit=yes

[Install]
WantedBy=graphical.target
- Enable it:
bash
sudo systemctl daemon-reload
sudo systemctl enable ddcutil-gamma.service
sudo systemctl start ddcutil-gamma.service
Conclusion
Your Argon ONE Up is now a color-accurate portable workstation. By splitting the work between hardware (DDC/CI) and software (ICC), you get the best possible gradients and color precision. Happy editing!
***************************************************************************************
P.S. For those interested in testing my specific setup, you can use these settings:
Hardware Adjustments:
Run the following command to configure brightness and RGB levels:
ddcutil --bus 14 --sleep-multiplier 2.0 setvcp 10 63 16 100 18 58 1A 88
To ensure these settings persist after a shutdown/reboot, refer to the steps explained above.
Color Calibration:
You can download my ICC profile and apply it through GNOME by navigating to Settings > Color and selecting “Import”.